
Prepare the MySQL or MariaDB database

Configure the database server
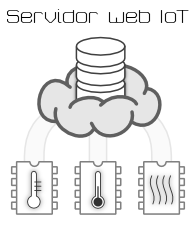
Once the set of services is installed LAMP, WAMP, MAMP o XAMPP As explained in the first article of the series or simply after installing on the machine that will act as a server the sum of applications that implement the corresponding services, it is necessary to adjust some aspects of the database server configuration MySQL as well as creating the databases and tables that will be used on the web server to store data from Internet of Things devices.
If a public server is used, the provider will surely have provided some type of panel to mediate between the user and the "real" configuration of the database in order to reinforce security in the operation. If so, you will have to refer to the instructions that this provider offers. In the case of a real or virtual server hosted in the facilities of a third party, a comparable circumstance may arise when the provider manages it; If a non-managed server has been contracted (by the provider, managed by the user), the following information will apply.
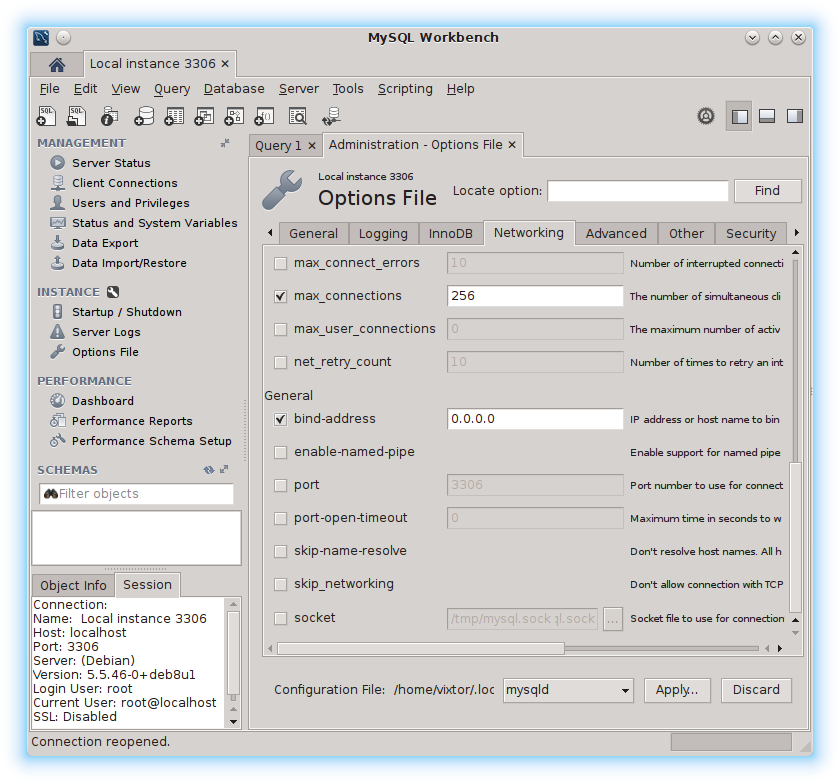
Since the important thing is to know the instructions that must be given to the database manager and it is understood that it is being used as a means to support devices for the Internet of Things, which would be the object of the project, it may be enough to use the console since the work on the database server itself will be occasional. If the management workload begins to increase, it may be worth it, because it is more convenient, to use a manager on the server itself, such as the popular phpMyAdmin (from a web browser) or locally, although of course accessing the database server, with an administrator such as MySQL Workbench from which to perform in an advanced GUI the operations that are going to be explained and many others that are outside of this article and that deserve a whole series.
In addition to the more or less automatic operations that can be done with MySQL Workbench on the server, databases or tables it is also possible to perform tasks "manually" by writing and executing complete scripts or independent commands in SQL. Same as with the tool MySQL Workbench, SQL requires a separate chapter and which will be essential to know in depth when the part of the IoT web work that is carried out involves more serious attention to the backend than is explained here.
In any case, and of course to resolve the necessary configuration of the IoT database that is being processed, the console can be used.
Configure root, the main MySQL administrator
If the database server is on its own machine, the first thing to do is configure the service administrator permissions to be able to create, using those privileges, other users (who in turn may have them) and, if applicable, the databases and tables in which to store the information that the Internet of Things system needs.
It is important to attend to the installation process of the set of services or the server MySQL, depending on the process followed, since, in many cases, the installer himself will be in charge of carrying out this step and others and it will not be necessary to repeat them except when you want to modify the configuration.
To perform these tasks, you usually work with the console. MySQL as administrator. To access this mode, use the command mysql -u root -p o sudo mysql -u root if used for the first time and during installation the user has not been configured root
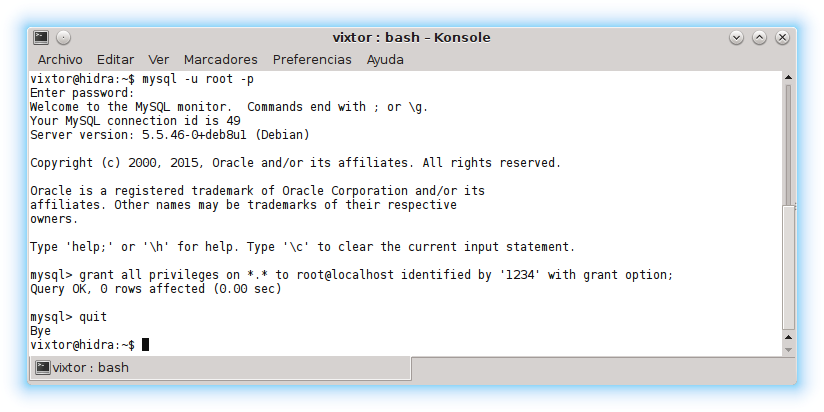
In to the Order mysql -u root -p indicated with the option -u the username (root) and with the option -p (password) that the key must be requested when accessing the console MySQL. To return to the system console you can use the command quit to go out
As seen in the screenshot above, before leaving the console MySQL, to set the user's privileges root the command has been used:
GRANT ALL PRIVILEGES ON *.* TO 'root'@'localhost' IDENTIFIED BY '1234' WITH GRANT OPTION;
in which:
- all privileges are granted
GRANT ALL PRIVILEGES - in all tables in all databases
ON *.* - to user
rootaccessing from the machine that runs the server MySQLTO 'root'@'localhost' - using 1234 as password
IDENTIFIED BY '1234' - with permission to authorize other users
WITH GRANT OPTION
In order to manage the database remotely, privileges must be granted to the corresponding user from other locations. In the previous example, it was allowed root accessed from the machine on which the database server is running (localhost) with 'root'@'localhost', if used 'root'@'%' Access will be allowed from any machine.
If you have administrator privileges on the system, you can re-establish the user password root de MySQL. To do so, it is necessary to stop the service (mysql o mysqld, depending on the distribution), boot it without a key, set the new key root and restart it. By accessing without a password it is also possible to grant the privileges described above.
- stop the service
sudo /etc/init.d/mysql stop - lanzar MySQL without key and unlock the console
sudo mysqld_safe --skip-grant-tables & - access as «
root»mysql -u root - change the password:
- access the database «
mysql":USE mysql; - assign to «
root» the key «1234»:UPDATE user SET authentication_string=PASSWORD("1234") WHERE user="root"; - apply the new privileges:
FLUSH PRIVILEGES; - exit console
mysqland return to the system:quit
- access the database «
-
restart service
sudo /etc/init.d/mysql restart
Configure remote database access
For security reasons, the initial configuration of the database manager MySQL does not allow remote access, to change it it is necessary to edit the configuration document, normally my.cnf, which is usually found on the route /etc/mysql.
If used MariaDB, which is now the "freer" version, of MySQL, surely my.cnf will be a link to /etc/alternatives/my.cnf which will, in turn, load the configuration, using !includedir, from the route documents /etc/mysql/mariadb.conf.d, probably from the document 50-server.cnf
The resource that the database server uses to not attend to remote requests consists of "listening" only to requests made from a certain location. IP address which is expressed as the value of the parameter bind-address (which replaces the classic skip-networking) When the address is 127.0.0.1 (localhost) only requests from the local machine are attended to. If commented with # or if the value is 0.0.0.0, we serve any address. To allow external access, the safest thing is to indicate the IP address (which can be public or private) of the computer it is accessed from, usually something like bind-address = 192.168.1.74. In your case, this equipment can act as a tunnel (redirecting with SSH) or as a walkway (with the core ip tables) to avoid exposing the server outside a controlled area of the network.
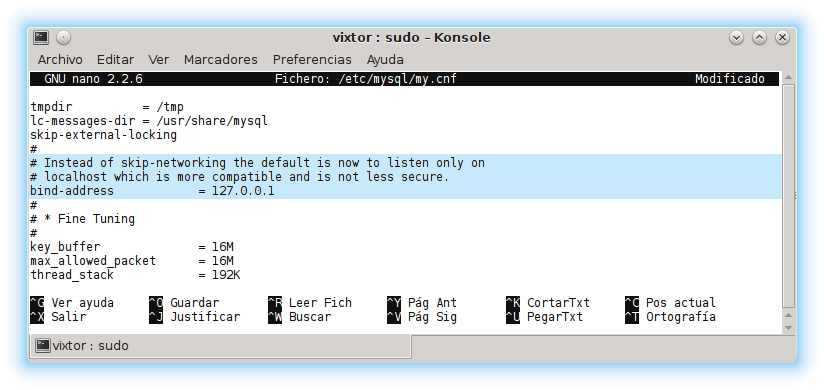
In the screenshot above you can see that it has been edited my.cnf with the configuration MySQL using the order sudo nano /etc/mysql/my.cnf. In the case of working with MariaDB With the usual configuration, the order would be something like sudo nano /etc/mysql/mariadb.conf.d/50-server.cnf. As mentioned above, once there is access with administrative privileges, a GUI as MySQL Workbench for regular database management.
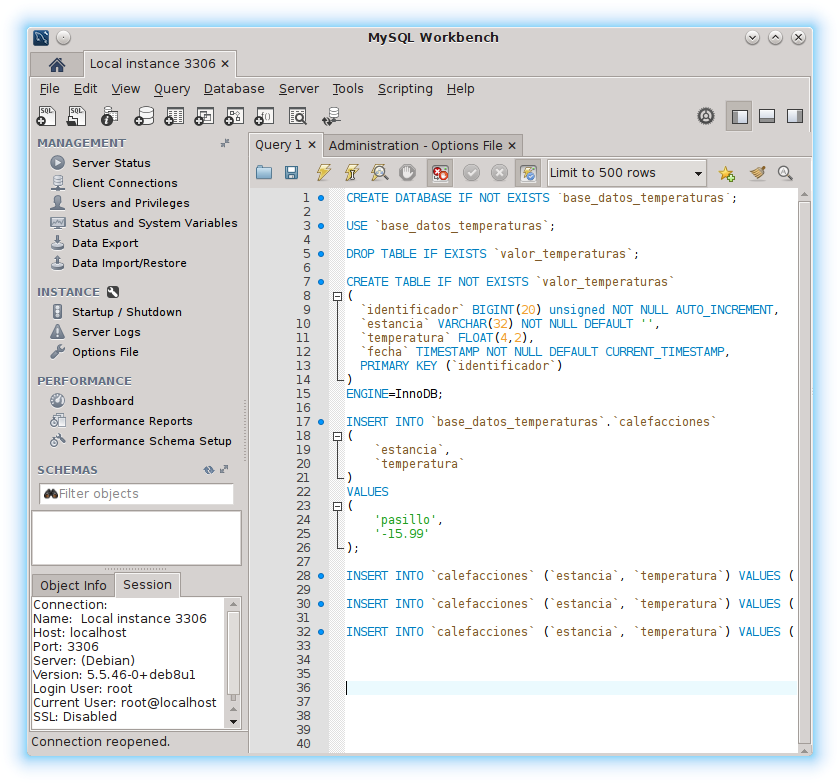
Create the databases
Once the database server is configured, the databases and tables in which to store the IoT data can be created. To do this, you can use commands SQL from the console or from the GUI of a manager.
The order CREATE DATABASE creates the “temperatures” database. To avoid errors, the form can be used temperaturas;CREATE DATABASE IF NOT EXISTS which would create the database “temperature_database” only if it does not currently exist.base_datos_temperaturas;
Create the tables
As in different databases there could be tables with the same name, you can refer to one of them by preceding its name with that of the database and separating both by a period, something like base_datos.tabla This notation can also be extended to the names of the fields base.tabla.campo
If the database name is omitted when operating on a table (in this case, when creating it) it is considered that the last selected one is referenced. To expressly select a specific one, you can use the command USE and indicate your name USE base_datos_temperaturas;
When creating tables in databases, in the same operation, the information of the fields that form them is usually added (although it is also possible to alter them later). Just as is done with the database, the table can be created only if it does not exist adding the clause IF NOT EXISTS or on the contrary, make sure to delete the table before creating it only if it exists using DROP TABLE IF EXISTS valor_temperaturas;
To allow names of tables or databases that could conflict with commands or procedures, the grave accent mark, sometimes called an inverted comma, can be used to surround the name and avoid conflicts or errors in the commands. SQL.
Define the fields
The fields that are added when creating the table are indicated by enclosing them in parentheses and indicating the type of data they store. The data types typically used in a database to store information from devices connected to the Internet of Things are integers (INT o BIGINT) decimals (DECIMAL, DOUBLE o FLOAT) of time (DATE, TIME, DATETIME o TIMESTAMP) and text (mainly VARCHAR although there are others like TEXT but they are not used for IoT) After the data type, and in parentheses, the length of the data and, if applicable, the format or precision are added.
By adding AUTO_INCREMENT The definition of a field indicates to the database manager that, if nothing else is indicated, when creating a new record the value of the last one plus the corresponding increment must be automatically stored (which is normally 1). It is usually included in the fields which are used as numerical indexes of the records.
The code NOT NULL indicates that a field in a record cannot be empty, it must store some value.
When using DEFAULT When creating a field of a table, it is indicated MySQL a default value for the field provided that when adding a new record or modifying it, another value is not expressly indicated. A frequently used default value, in this case to monitor IoT values, is CURRENT_TIMESTAMP which allows you to automatically record the current time in a field when creating a new record, so data is automatically identified in time.
To optimize the performance of the database, it is convenient to include at the end of the definition of the table fields one that is used as an index with the clause PRIMARY KEY ( ID being the field chosen as the index.ID)
At the end of the definition of a table you can indicate the database engine with which it is managed as the parameter value ENGINE with the format ENGINE=InnoDB; siendo InnoDB the engine chosen in this case.
Create databases, tables and configure fields in a SQL session
The code in the following example brings together the orders, the steps that would have to be taken, to create a database with a minimum table.
|
1
2
3
4
5
6
7
8
9
10
11
12
13
14
15
16
17
|
CREATE DATABASE `base_datos_temperaturas`;
CREATE DATABASE IF NOT EXISTS `base_datos_temperaturas`;
USE `base_datos_temperaturas`;
DROP TABLE IF EXISTS `calefacciones`;
CREATE TABLE IF NOT EXISTS `calefacciones`
(
`identificador` BIGINT(20) unsigned NOT NULL AUTO_INCREMENT,
`estancia` VARCHAR(32) NOT NULL DEFAULT ”,
`temperatura` FLOAT(4,2),
`fecha` TIMESTAMP NOT NULL DEFAULT CURRENT_TIMESTAMP,
PRIMARY KEY (`identificador`)
)
ENGINE=InnoDB;
|
Create backup copies of databases
Once the server is configured and the database and its tables have been created, everything would be ready to store the information obtained by the IoT nodes. Although the focus of this series of articles does not include maintenance, there is one critical administrative issue that is important to address: backups. From most managers, including phpMyAdmin y MySQL Workbench, backup copies can be made and restored but it is common to include them in a script that automates them (probably along with the configuration and many other documents) so it is more convenient to use the tool MySQLDump, a client that is usually part of a conventional installation of MySQL, or some alternative like MySQL Data Dumper What does the order include? mydumper to make the copy and myloader to restore it
MySQLDump
The order format mysqldump It's very simple, you just have to indicate the username user, Password password and the database you want to copy or --all-databases to backup all databases like in the following example:
mysqldump --opt --user=pelaez --password=1234 --all-databases > copia.sql
The previous example generates the document copia.sql which contains the orders SQL (i.e. text) needed to rebuild all databases. When saved in text format, the copy takes up much more than necessary, which is why it is also usually compressed to save space on the device on which it is stored.
The backup generated with the example command could be restored if the information were lost due to an error with the command below that executes the operations SQL of the document copia.sql
mysql --user=pelaez --password=1234 < copia.sql
MySQL Data Dumper
Although the previous operations would be sufficient, it is very common to use MySQL Data Dumper, already almost a standard for its performance although it is not part of the base tools included with MySQL
The following are the options of mydumper most used that, logically, should be written as part of the same command, separated by spaces, although in this text they have been separated into lines to facilitate reading:
--host polaridad.es “polaridad.es” is the name of the database server
--port 3306 "3306" is the port number on which the server listens (by default it is 3306)
--user pelaez "pelaez" is the name of the user with whom the database is accessed
--password 1234 "1234" is the password of the user with whom the database is accessed
--database temperaturas “temperatures” is the name of the database being backed up
--no-locks do not lock the database during the copy (by default it locks)
--build-empty-files also copy empty tables
--compress-input compress input
--compress compress the output (the resulting backup)
To restore the backup obtained with mydumper it is used myloader which is primarily used with the following options, which must be included in the same order separated by spaces:
--host polaridad.es “polaridad.es” is the name of the database server
--port 3306 "3306" is the port number on which the server listens (by default it is 3306)
--user pelaez "pelaez" is the name of the user with whom the database is accessed
--password 1234 "1234" is the password of the user with whom the database is accessed
--directory=copia_iot «iot_copy» is the folder in which the copy generated with is located mydumper
--overwrite-tables overwrite tables even if they already exist
--verbose 3 "3" is the degree of information of the process (higher, more messages)
-C use compression on the data stream
The next (and last) article in this series explains how to use the PHP programming language to store the information obtained by devices connected to the Internet of Things in databases which have been talked about in this text.


Post Comment