
Serial Communications with Processing
The Serial class
The operations to use serial communications in Processing are defined in the class Serial.The first operation to perform to use them in a program (sketch) will be to incorporate it into the code with import processing.serial.*;.
Class Serial It has five different constructors depending on the parameters indicated. The only required parameter is the parent object (parent) which usually corresponds to the main program (say, the program window) of the class PApplet. As normally the parent will be the program being written (the sketch current), the value of this first mandatory parameter will be this.
The other five parameters that can be passed to the constructor are ① the speed, ② the name of the serial port ③ the parity used in the protocol, ④ the data bits and ⑤ the stop bits. The most frequently passed parameters, in addition to the required parent object, are the port name and speed.
La serial communications speed is an integer (int) what defaults to the value 9600 if this parameter is not passed to the constructor.
Serial ports available. The list method
El port name has the form determined by the system, in this way, for example in Linux distributions it will be something like /dev/ttyS4 /dev/ttyACM3 o / dev / ttyUSB1 (depending on the port type), while on Windows it will be something like COM12. Unless a port is physically associated with a device, the program will normally not know which port to use. A common way to select the port is to obtain a list of the available ones, show it to the user and allow them to choose the one they want to use. The method Serial.list() returns a vector of text strings (String) with the names of the ports available on the system.
|
1
2
3
4
5
6
7
8
9
|
// Mostrar los puertos serie disponibles en el sistema
import processing.serial.*;
void setup()
{
noLoop(); // No iterar (no llama a draw periódicamente)
println(Serial.list());
}
|
The port used by default by the library Serial is the first of those returned by the method list (surely COM1 on Windows or /dev/ttyS0 en GNU / Linux). Except in very limited contexts in which the hardware being worked with is strictly known (such as a system in kiosk mode), it is not usually omitted and the destination port is expressly indicated.
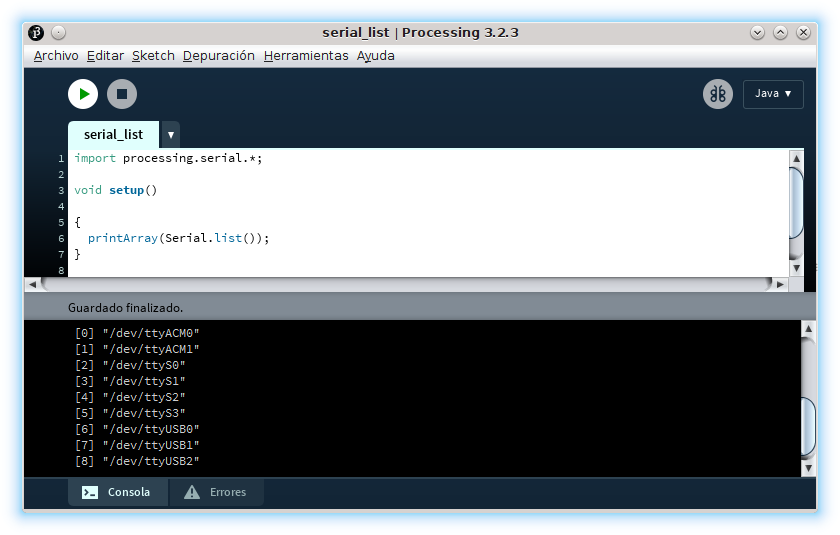
The screenshot above shows the output of a system GNU / Linux which has four serial ports RS-232 (ttyS0 a ttyS3) and five adapters of two types (ttyACM0 a ttyACM1 y ttyUSB0 a ttyUSB2).

In order to access the serial ports, the user must belong to the group to which the system assigns them, normally tty o dial out. In the screenshot of the image above you can see that the serial ports listed with ls /dev/tty[ASU]* -la belong to the group dial out which has read and write access permissions on them.
Serial protocol parameters
La parity of serial communications is expressed in Processing as a character (char) which can take the values: ① N (none) to not detect the parity, ② E (Even) to indicate that the parity bit is even, ③ O (odds) to indicate that the parity bit is odd, ④ M (mark) to always make the parity bit and ⑤ S (space) to always make one the parity bit. The default value, if not passed to the constructor as a parameter, is N (without parity).
Number data bits, which is eight by default, indicates the number of bits that make up the net data payload (called a character or sometimes a word) that is transmitted in each basic unit of the frame. The parameter indicating the number of data bits is expressed as an integer (int).
Finally, the fifth possible parameter indicates the duration of the final mark, expressed as stop bits (stop bits), which is indicated as a number represented in floating point (float) that can take the values 1.0 (the default value if the parameter is not passed to the constructor), 1.5: 2.0.
Constructors of the Serial class
The following list shows the different combinations of parameters that can be passed to the class constructor Serial:
Serial(padre)Serial(padre,puerto)Serial(padre,velocidad)Serial(padre,puerto,velocidad)Serial(padre,puerto,velocidad,paridad,bits_datos,bits_parada)
End serial communications. The stop method.
To release the serial port, assigned when instantiating Serial, and that other system applications can use it, communications are terminated with the method stop, which does not receive parameters.
|
1
2
3
4
5
6
7
8
9
10
|
import processing.serial.*;
Serial serie;
void setup()
{
noLoop(); // No iterar
serie=new Serial(this,“/dev/ttyUSB0”,9600); // Usar un puerto USB con un adaptador UART
serie.stop(); // Detiene las comunicaciones serie y libera el puerto ttyUSB0 para otros usos
}
|
Send data through the serial port. The write.method
To send data, the class Serial de Processing incorporates the method write with which you can transmit ① text strings (String), ② bytes or ③ byte vectors (byte[]). It is interesting to remember that byte en Processing (At Java) represents an integer between -128 and 127 and, by default, strings use the encoding UTF-16.
|
1
2
3
4
5
6
7
8
9
10
11
12
13
14
|
import processing.serial.*;
Serial serie;
String texto=“Ohm”;
void setup()
{
noLoop();
serie=new Serial(this,“/dev/ttyUSB0”,9600); // Usar un puerto USB con un adaptador UART
serie.write(texto); // Envía el texto “Ohm”
serie.write(10); // Envía un fin de línea \n que corresponde con el ASCII 10
serie.write(200); // Envía el valor -56 ¡Es un byte, va de -128 a 127! (200-256=-56)
serie.stop(); // Detiene las comunicaciones serie y libera el puerto ttyUSB0 para otros usos
}
|
Read data from serial port
So that the program can perform other tasks while data is received through the serial port, it is usual to store in a buffer the data that arrives and read it when appropriate. Although usually not very efficient, you can stop the application to load all available data; However, the most common thing will be to read the information as it arrives, either in each iteration of draw, when a certain quantity is available or a special code has been received.
Amount of data available in the buffer. The available method
To know if data has arrived at buffer series, the method available returns the number of bytes that have already been stored in this buffer. In either case, read operations can return a special value (such as -1 o null) when trying to load data from buffer series when empty.
|
1
2
3
4
5
6
7
8
9
10
11
12
13
14
15
16
|
import processing.serial.*;
Serial serie;
void setup()
{
frameRate(1); // Llama a draw una vez por segundo
serie=new Serial(this,“/dev/ttyUSB0”,9600);
}
void draw()
{
print(“Hay “);
print(serie.available());
println(” bytes en el buffer serie”);
}
|
Load one byte at a time. The read method
The main methods of the class Serial that serve to read the information received by a serial port are those of "type read» that differ between them, mainly, by the type of data in which they deliver the information received.
read is used to deliver the bytes received by the serial port as a value between 0 and 255. As the data type byte de Processing represents the range between -128 and 127 and not between 0 and 255, it is necessary to use a int in order to represent the range returned by read. If you try to read with read and buffer string is empty, returns value -1
|
1
2
3
4
5
6
7
8
9
10
11
12
13
14
15
16
17
|
import processing.serial.*;
Serial serie;
void setup()
{
frameRate(10); // Llama a draw 10 veces por segundo
serie=new Serial(this,“/dev/ttyUSB0”,9600);
}
void draw()
{
if(serie.available()>0)
{
println(serie.read());
}
}
|
Read characters from the serial port. The readChar method
The method readChar is similar to read but it returns a value in format char instead of a int. As internally, the char en Processing (At Java) are stored with two bytes, the value chosen to return when reading with readChar a buffer empty series is 0xFFFF o -1.
|
1
2
3
4
5
6
7
8
9
10
11
12
13
14
15
16
17
|
import processing.serial.*;
Serial serie;
void setup()
{
frameRate(10);
serie=new Serial(this,“/dev/ttyUSB0”,9600);
}
void draw()
{
if(serie.available()>0)
{
print(serie.readChar());
}
}
|
Load a text string. The readString and readStringUntil methods.
The method readString returns an object String formed from all the data available in the buffer series at the time of consultation.
The method readString creates the text string assuming that the bytes received by the serial port are in the format ASCII so this reading method cannot be used for other encodings.
If it is about reading the buffer series with readString when empty, the return value is null.
The method readStringUntil add to readString the ability to return information loaded into the buffer series splitting it by a special character (code) that is passed as a parameter. This way of reading the information received allows us to distinguish both separators and terminators that help interpret the information received.
The method readStringUntil bring back null when in the buffer series does not find the code specified in the argument passed to it (one byte).
|
1
2
3
4
5
6
7
8
9
10
11
12
13
14
15
16
17
18
19
20
21
22
|
import processing.serial.*;
Serial serie;
String mensaje;
void setup()
{
frameRate(5);
serie=new Serial(this,“/dev/ttyUSB0”,9600);
}
void draw()
{
if(serie.available()>1)
{
mensaje=serie.readStringUntil(9); // Lee los datos del buffer hasta encontrar un tabulador
if(mensaje!=null) // Si la respuesta no es null ya ha llegado el tabulador y el mensaje está completo
{
println(“Mensaje recibido: “+mensaje); // Mostrar el mensaje si ha llegado completo
}
}
}
|
In the following code for Arduino sends three messages through the serial port. The first two end in a tab, so they will appear in the console. Processing, while the third, although it will be sent through the serial port, will not be read with readStringUntil(9) since it does not end in a tab (with code ASCII 9).
|
1
2
3
4
5
6
7
8
9
10
11
12
|
void setup()
{
Serial.begin(9600);
while(!Serial);
Serial.print(“Primer mensaje\t”);
Serial.print(“Segundo mensaje\t”);
Serial.print(“Tercer mensaje”); // Este mensaje no llega porque no termina en tabulador
}
void loop()
{
}
|

Read data blocks. The readBytes and readBytesUntil methods.
The methods seen above are used to read data with specific formats, to read blocks of raw data or with a format that is not provided for in Processing methods are used readBytes y readBytesUntil
The method readBytes try to read the data available in the buffer series. If no parameter is passed to the method readBytes all available data is read and returned in a vector (byte[]). If an integer is passed as a parameter, a maximum of the number of bytes indicated by this number is read and they are also returned as a vector.
There is a third way to use readBytes, more efficient, which takes as an argument a byte vector into which the contents of the buffer series. This way of using readBytes returns an integer (int) which represents the number of bytes that have been read.
The method readBytesUntil works in a similar way but includes a first parameter that represents the value of the byte that, if found in the buffer, will indicate the end of the reading. In this method, the parameter that determines the maximum number of bytes that will be read does not make sense since the amount will be determined by the special code.
To test the operation of the method readBytes Let's assume the following code for Arduino which sends a text through the serial port.
|
1
2
3
4
5
6
7
8
9
10
|
void setup()
{
Serial.begin(9600);
while(!Serial);
Serial.println(“En Viena hay diez muchachas, un hombro donde solloza la muerte y un bosque de palomas disecadas. Hay un fragmento de la mañana en el museo de la escarcha. Hay un salón con mil ventanas.”);
}
void loop()
{
}
|
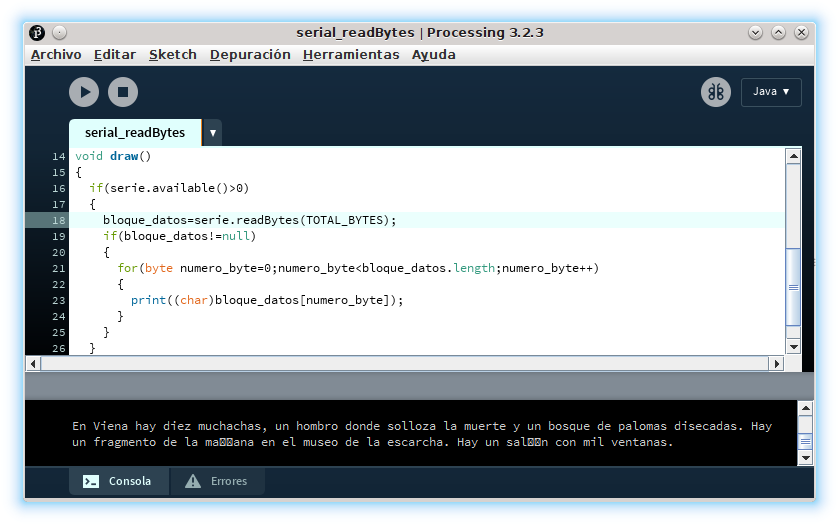
The following example program for Processing reads text from the serial port in 32-byte blocks (TOTAL_BYTES). To verify that it works, it shows it through the console as characters, forcing the type of the bytes received to char.
|
1
2
3
4
5
6
7
8
9
10
11
12
13
14
15
16
17
18
19
20
21
22
23
24
25
26
27
|
import processing.serial.*;
Serial serie;
byte bloque_datos[];
static byte TOTAL_BYTES=32;
void setup()
{
frameRate(10);
serie=new Serial(this,“/dev/ttyUSB0”,9600);
bloque_datos=new byte[TOTAL_BYTES];
}
void draw()
{
if(serie.available()>0)
{
bloque_datos=serie.readBytes(TOTAL_BYTES);
if(bloque_datos!=null)
{
for(byte numero_byte=0;numero_byte<bloque_datos.length;numero_byte++)
{
print((char)bloque_datos[numero_byte]);
}
}
}
}
|
In the following screenshot you can see how they are displayed in the console Processing the data that has been loaded in blocks of (maximum) 32 bytes (TOTAL_BYTES) every time. But there is a problem that has already been talked about: Arduino has been sending the verses of Federico Garcia Lorca of the example encoded as text in format UTF-8, which is not the one used Processing (Java), what do you prefer UTF-16 so those who do not correspond to the rank of the ASCII printable are interpreted incorrectly.
To solve this problem, the character sets can be loaded (charset) and define a new object String forcing it to be represented with encoding UTF-8 as shown in the following example code.
|
1
2
3
4
5
6
7
8
9
10
11
12
13
14
15
16
17
18
19
20
21
22
23
24
25
|
import processing.serial.*;
import static java.nio.charset.StandardCharsets.*;
Serial serie;
byte bloque_datos[];
static byte TOTAL_BYTES=32;
void setup()
{
frameRate(10);
serie=new Serial(this,“/dev/ttyUSB0”,9600);
bloque_datos=new byte[TOTAL_BYTES];
}
void draw()
{
if(serie.available()>0)
{
bloque_datos=serie.readBytes(TOTAL_BYTES);
if(bloque_datos!=null)
{
print(new String(bloque_datos,UTF_8));
}
}
}
|

Read the latest data received. The last and lastChar methods.
While the rest of the reading methods (the "type read») they load the information of the buffer series in the same order that it has arrived (FIFO), with these two methods the last byte that has reached the buffer series. The method last returns the value of the last byte as a int y lastChar returns the value as a char.
Serial buffer management
Although the methods seen so far are perfectly functional, they do not always represent the best way to exploit access to the serial port. To load the data, they need to periodically check the status of the buffer series and read the data available in a repeating part of the code. A generally more efficient way is to read the data only when you know it is available.
Read the serial port when data is received. The Serial event.
To access the buffer serial when the data is received, the Serial event can be exploited by managing it through the method definition serialEvent. This method uses the serial port that launches it as an argument.
|
1
2
3
4
5
6
7
8
9
10
11
12
13
14
15
16
17
|
import processing.serial.*;
Serial serie;
void setup()
{
serie=new Serial(this,“/dev/ttyUSB0”,9600);
}
void draw()
{
}
void serialEvent(Serial comunicaciones)
{
print(comunicaciones.readChar());
}
|
Size the serial buffer. The buffer method.
If you know the number of bytes that make up a block of useful data, you can further optimize this style of reading the data. buffer series through serialEvent. The method buffer allows you to set the number of bytes that will be stored in the buffer before launching a Serial event. The method expects as a parameter an integer that represents the number of bytes.
|
1
2
3
4
5
6
7
8
9
10
11
12
13
14
15
16
17
18
19
20
21
22
|
import processing.serial.*;
Serial serie;
void setup()
{
//noLoop();
serie=new Serial(this,“/dev/ttyUSB0”,9600);
serie.buffer(32); // Esperar a recibir 32 bytes antes de lanzar el evento Serial
}
void draw()
{
}
void serialEvent(Serial comunicaciones)
{
while(comunicaciones.available()>0)
{
print(comunicaciones.readChar());
}
}
|
Fill the buffer until a value is received. The bufferUntil method.
Instead of setting the method call serialEvent for a quantity of data in the buffer, with the method bufferUntil you can configure to store data until a special value arrives and then raise the Serial event. The parameter passed to this method is a int which represents the value produced by the call to serialEvent.
|
1
2
3
4
5
6
7
8
9
10
11
12
13
14
15
16
17
18
|
import processing.serial.*;
Serial serie;
void setup()
{
serie=new Serial(this,“/dev/ttyUSB0”,9600);
serie.bufferUntil(9); // Espera a recibir un tabulador (ASCII 9) antes de llamar a serialEvent
}
void draw()
{
}
void serialEvent(Serial comunicaciones)
{
println(comunicaciones.readString()); // Imprime en una línea diferente cada valor separado originalmente por tabuladores
}
|
Delete the data stored in the buffer. The clear method.
With the method clear You can delete the data that is currently in the buffer. This method can be used, for example, to start a new data reception session ignoring the data remaining from the previous one.
Typical Processing application for reading data through the serial port
Finally, it is convenient to recapitulate the operations of the object Serial de Processing that are more commonly used, going through a typical example of receiving data through the serial port to draw a graph with them, in this case of stacked areas.
Import the Serial library
|
1
|
import processing.serial.*;
|
Determine data protocol (separators)
|
1
2
|
static final String SEPARADOR=“\t”; // Los datos de cada sensor se separan con un tabulador
static final char TERMINADOR=10; // Cada grupo de datos se termina con un código ASCII 10 → Nueva línea → \n
|
Determine the object of the Serial class
|
1
|
Serial conexion_sensores;
|
Instantiate the Serial class object by setting the serial port used
|
1
|
conexion_sensores=new Serial(this,“/dev/ttyUSB1”,9600);
|
Configure the serial port buffer
|
1
|
conexion_sensores.bufferUntil(TERMINADOR);
|
Implement a handler for the Serial event
|
1
|
void serialEvent(Serial serie)
|
Read serial buffer
|
1
|
String[] texto_valor=serie.readString().split(SEPARADOR);
|
Condition the data received
|
1
2
3
4
5
|
float[] valor=new float[texto_valor.length];
for(int numero_valor=0;numero_valor<texto_valor.length;numero_valor++)
{
valor[numero_valor]=parseFloat(texto_valor[numero_valor]);
}
|
End serial communications
|
1
2
|
conexion_sensores.clear();
conexion_sensores.stop();
|
The example code below illustrates this summary with a functional (although very simple) application that generates an area graph with the values that are received through the serial port, something similar to what the following animation shows.

In order not to get lost in the rest of the program and focus attention on serial communications with Processing, the lines of code that correspond to the previous operations are highlighted.
|
1
2
3
4
5
6
7
8
9
10
11
12
13
14
15
16
17
18
19
20
21
22
23
24
25
26
27
28
29
30
31
32
33
34
35
36
37
38
39
40
41
42
43
44
45
46
47
48
49
50
51
52
53
54
55
56
57
58
59
60
61
62
63
64
65
66
67
68
69
70
71
72
73
74
75
76
77
78
79
80
81
82
83
84
85
86
87
88
89
90
91
92
93
94
95
96
97
98
99
100
101
102
103
104
105
106
107
108
109
110
111
112
113
114
115
116
117
118
119
120
121
122
123
124
125
126
127
128
129
130
131
132
133
134
135
136
137
138
139
140
141
142
143
144
145
146
147
148
149
150
|
import processing.serial.*;
static final byte ROJO=0,VERDE=1,AZUL=2,OPACIDAD=3;
static final int CANTIDAD_SENSORES=3;
static final int CANTIDAD_VALORES=20;
static final String NOMBRE_FONDO=“fondo.png”;
static final int[][] COLOR_LINEA={{0x44,0x88,0xCC,0xFF},{0xFF,0xAA,0x00,0xFF},{0xCC,0x44,0xAA,0xFF}};
static final int[][] COLOR_AREA={{0x44,0x88,0xCC,0x88},{0xFF,0xAA,0x00,0x88},{0xCC,0x44,0xAA,0x88}};
static final int[] COLOR_FONDO={0xFF,0xFF,0XFF};
static final float GROSOR_LINEA=2.0;
static final float DIAMETRO_MARCA=8.0;
static final float VALOR_MINIMO=0.0; // Valor mínimo de la suma de todos los componentes
static final float VALOR_MAXIMO=100.0; // Valor máximo de la suma de valores
static final String SEPARADOR=“\t”; // Los datos de cada sensor se separan con un tabulador
static final char TERMINADOR=10; // Cada grupo de datos se termina con un código ASCII 10 → Nueva línea → \n
Serial conexion_sensores;
float[][] valor_sensor=new float[CANTIDAD_SENSORES][CANTIDAD_VALORES];
float coeficiente_valor;
float[] vertical_area=new float[CANTIDAD_VALORES];
float[] vertical_marca=new float[CANTIDAD_VALORES];
PImage fondo;
void setup()
{
size(792,396,P2D); // El tamaño de la ventana no se puede establecer con variables en setup (usar settings)
surface.setResizable(false);
surface.setTitle(“consumo relativo comparado”);
noLoop();
smooth(4);
conexion_sensores=new Serial(this,“/dev/ttyUSB1”,9600);
conexion_sensores.bufferUntil(TERMINADOR);
for(int numero_sensor=0;numero_sensor<CANTIDAD_SENSORES;numero_sensor++)
{
for(int numero_valor=0;numero_valor<CANTIDAD_VALORES;numero_valor++)
{
valor_sensor[numero_sensor][numero_valor]=0.0;
}
}
fondo=loadImage(NOMBRE_FONDO);
coeficiente_valor=height/(VALOR_MAXIMO–VALOR_MINIMO);
//strokeCap(ROUND); // El modo del final de líneas por defecto es redondeado
//ellipseMode(CENTER); // Por defecto el modo de elipse es desde el centro
if(DIAMETRO_MARCA>GROSOR_LINEA) // Si la marca no es visible hay que configurar el tipo de esquina
{
strokeJoin(ROUND); // El modo de esquina por defecto es en ángulo
}
}
void draw()
{
for(int numero_valor=0;numero_valor<valor_sensor[0].length;numero_valor++)
{
vertical_area[numero_valor]=height;
for(int numero_sensor=0;numero_sensor<valor_sensor.length;numero_sensor++)
{
vertical_area[numero_valor]-=(valor_sensor[numero_sensor][numero_valor]–VALOR_MINIMO)*coeficiente_valor;
}
vertical_marca[numero_valor]=vertical_area[numero_valor];
}
if(fondo==null)
{
background(COLOR_FONDO[ROJO],COLOR_FONDO[VERDE],COLOR_FONDO[AZUL]);
}
else
{
image(fondo,0,0);
}
strokeWeight(GROSOR_LINEA);
for(int numero_sensor=0;numero_sensor<valor_sensor.length;numero_sensor++)
{
stroke
(
COLOR_LINEA[numero_sensor][ROJO],
COLOR_LINEA[numero_sensor][VERDE],
COLOR_LINEA[numero_sensor][AZUL],
COLOR_LINEA[numero_sensor][OPACIDAD]
);
fill
(
COLOR_AREA[numero_sensor][ROJO],
COLOR_AREA[numero_sensor][VERDE],
COLOR_AREA[numero_sensor][AZUL],
COLOR_AREA[numero_sensor][OPACIDAD]
);
beginShape();
for(int numero_valor=valor_sensor[numero_sensor].length–1;numero_valor>=0;numero_valor—)
{
vertex(numero_valor*width/(valor_sensor[numero_sensor].length–1),vertical_area[numero_valor]);
}
for(int numero_valor=0;numero_valor<valor_sensor[numero_sensor].length;numero_valor++)
{
vertical_area[numero_valor]+=(valor_sensor[numero_sensor][numero_valor]–VALOR_MINIMO)*coeficiente_valor;
vertex(numero_valor*width/(valor_sensor[numero_sensor].length–1),vertical_area[numero_valor]);
}
endShape(CLOSE);
if(DIAMETRO_MARCA>0)
{
noStroke();
fill
(
COLOR_LINEA[numero_sensor][ROJO],
COLOR_LINEA[numero_sensor][VERDE],
COLOR_LINEA[numero_sensor][AZUL],
COLOR_LINEA[numero_sensor][OPACIDAD]
);
for(int numero_valor=0;numero_valor<valor_sensor[numero_sensor].length;numero_valor++)
{
ellipse
(
numero_valor*width/(valor_sensor[numero_sensor].length–1),
vertical_marca[numero_valor],
DIAMETRO_MARCA,
DIAMETRO_MARCA
);
vertical_marca[numero_valor]=vertical_area[numero_valor];
}
}
}
}
void stop() // Al terminar un Applet. No hay garantía de que se ejecute y, como estas operaciones se realizan al terminar, en realidad no son necesarias y solo se incluyen para recordar el uso de clear y stop
{
conexion_sensores.clear(); // Solo para ilustrar la posibilidad de borrar los datos que queden en el buffer
conexion_sensores.stop(); // Solo para ilustrar la posibilidad de terminar las comunicaciones serie y liberar el puerto que se está usando
}
void serialEvent(Serial serie)
{
String[] texto_valor=serie.readString().split(SEPARADOR);
float[] valor=new float[texto_valor.length];
for(int numero_valor=0;numero_valor<texto_valor.length;numero_valor++)
{
valor[numero_valor]=parseFloat(texto_valor[numero_valor]);
}
nuevo_valor(valor_sensor,valor);
redraw();
}
void nuevo_valor(float[][] valor_sensor, float[] valor)
{
for(int numero_sensor=0;numero_sensor<valor_sensor.length;numero_sensor++)
{
for(int numero_valor=1;numero_valor<valor_sensor[0].length;numero_valor++)
{
valor_sensor[numero_sensor][numero_valor–1]=valor_sensor[numero_sensor][numero_valor];
}
valor_sensor[numero_sensor][valor_sensor[0].length–1]=valor[numero_sensor];
}
}
|


Post Comment